REST Web Service Resource Security
Using Http Basic Authentication
Using Http Digest Authentication
Using Http NTLM Authentication
See also: REST Overview, Working with Rest Web Service Resource, OAuth 2.0, Server Admin OAuth Configuration
Introduction
Each endpoint within
a REST web services resource supports:
1.
HTTP Basic Authentication and HTTP Digest Authentication – in accordance with RFC
2617
2.
NTLM Authentication in accordance with
Microsoft authentication.
The security options
described below are configured for a REST web services resource by selecting an
endpoint, then clicking the ![]() icon on the endpoint toolbar.
icon on the endpoint toolbar.
Http Security
Using
Http Basic Authentication
Http Basic
authorization is a HTTP/1.0 standard used by web servers to authenticate a
client to allow access to particular web applications. Http basic
authentication adds the username and password as a base 64 encoded string to
the HTTP Header.
To configure HTTP Basic Authentication select the Http-Security tab within the REST
Resource Security Configuration dialog.
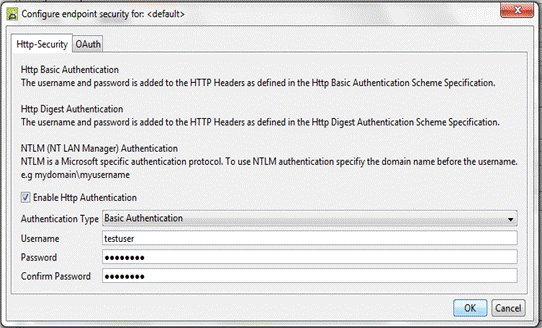
1)
Select
Enable Http Authentication.
2)
Select the Authentication Type - Basic
Authentication
3)
Enter
the username. This value supports substitutable field
parameters. See substitutable
parameters for more details.
4)
Enter
the password. This value supports substitutable field
parameters. See substitutable
parameters for more details.
5)
Confirm
the password.
6)
Click OK
button.
Using Http Digest Authentication
HTTP Digest Authentication is configured similarly to Http Basic Authentication. Follow the configuration steps as described in Using Http Basic Authentication but select Digest Authentication as the Authentication Type in step 2.
Using Http NTLM
Authentication
NTLM (NT LAN Manager) is a Microsoft authentication protocol. NTLM authentication is configured in the same way as Http Basic Authentication except that the domain name is included as part of the username. The username must be entered as <domain-name>\<username>.
Follow the configuration steps as described in Using Http Basic Authentication but select Digest Authentication as the Authentication Type in step 2.
OAuth Security
OAuth configurations are created using the Server Administration Application. Once created, enter the config name as shown below.
It is possible to override the username, password, scope and additional parameters fields that are configured using the Server Administration Application. The username and password fields are only applicable when using Resource Owner Password Credentials Grant. The scope and additional parameters fields are applicable when using Resource Owner Password Credentials Grant or Client Credentials Grant.
Using OAuth Security
To configure OAuth Authentication
select the OAuth
tab within the REST Resource Security Configuration dialog.
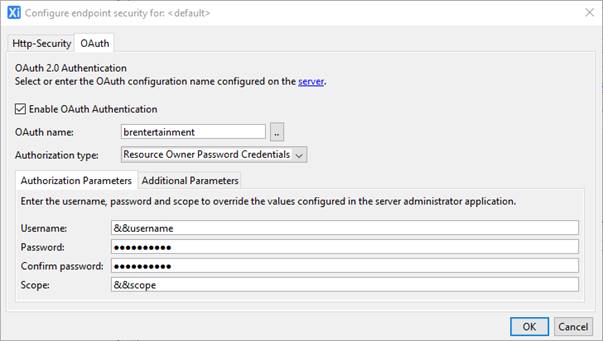
1) Select Enable OAuth Authentication
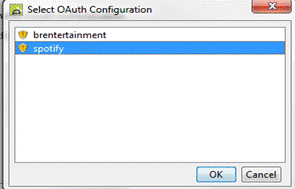
2) Either enter the OAuth name as configured using the server administration application or click on the .. button and select the OAuth configuration from the list. To select from a list of configured OAuth configurations an Ebase server must be running.
3) Select the authorization type: this is populated automatically from the OAuth Configuration on the server. Additional parameters can be configured when either Resource Owner Password Credentials or Client Credentials is selected as the authorization type. These parameters can be overridden dynamically at runtime by using variable substitution fields (e.g &&username):
Resource Owner Password Credentials
Enter a username, password and/or scope to override the corresponding value configured using the Server Administration Application.
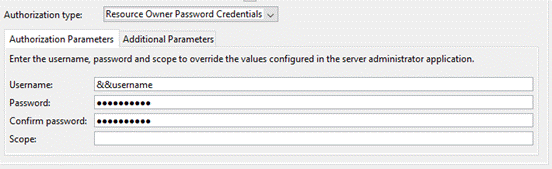
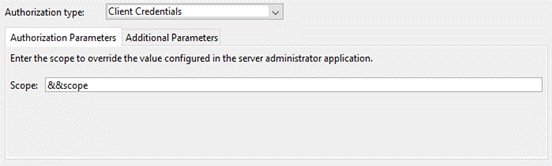
Client Credentials
Enter a scope to override the corresponding value configured using the Server Administration Application.
4) Click OK button.
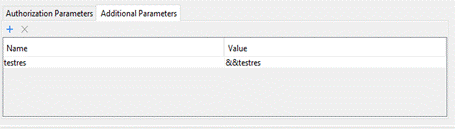
Additional Parameters
Additional parameters are only applicable to Resource Owner Password and Client Credentials authentication. Add additional parameters by clicking on the Additional Parameters tab.
1) Click
the ![]() to add a new parameter
to add a new parameter
2) Enter a name for the parameter
3) Enter a value for the parameter. This can be a substitution field.
To remove a parameter, select the
parameter that you would like to remove and click![]() .
.
Note: If there are no OAuth configurations on the server, then click the server hyperlink in the panel to launch the Server Administration Application and then select the OAuth Configurations menu item.