Tutorial7: Calling a RESTful Web
Service
See
also: All
Tutorials
The following documentation is available for REST Web Services:
- REST overview provides an overview
of the options available within Ebase Xi for calling a RESTful
web service
- Using the Programming API provides
details of calling a RESTful web services via
the Programming API
- Working with Rest Web Service Resource provides
details of calling a RESTful web service using a
REST Web Service Resources
- OAuth 2.0
provides
information on OAuth authentication commonly
used with RESTful web services
Within
Ebase Xi, there are 2 different ways of calling a RESTful
Web Service. They both achieve the same result(s).
- Using a Javascript
script to build the request, call the RESTful
Web Service and extract the response body. The required information is
then extracted from the response body using javascript
script.
- Calling an Ebase REST Web
Service Resource. This will automatically build the request from form
fields, call the RESTful Web Service and extract
the response body into a form field. As before, required information is
then extracted from the response body form field using javascript
script.
Advantages
and disadvantages:
- Approach one involves more
coding. All the work is done in code and there is no need to create a REST
Web Service Resource.
- Approach two involves less
coding, but requires setting up a REST Web Service Resource with the
correct Target Base URI, Endpoint URI(s) and method(s), Request and
Response headers and parameters, and Resource fields. These resource
fields need to be mapped to form fields.
This page is a tutorial designed to provide a quick
introduction to using REST Web Service API calls and REST Web
Service resources. This is recommended as the place to start learning about
REST Web Services.
Part
1 - A simple REST Web Service API call
Part 2 - A REST Web Service call using an Ebase REST Web Service Resource
Part 1 - A REST Web Service API call
This
tutorial works with a Spotify REST web service.
Please see https://developer.spotify.com/web-api/search-item/
for details.
Step 1. Start
with the Ebase Xi Designer running.
a. If
the Tutorials
project doesn’t already exist, create it by right clicking in the tree panel
and selecting New > Project, then link the new project to the ebaseSamples project
(right click on the project name, then select Properties).
b. Create
a new folder for the tutorial: right click on the Tutorials project and select New > Folder, name the folder Tutorial7.
Step 2. Create a new form
a. Right
click on the Tutorial7 folder in the tree panel, enter New
> Form and name the form SpotifyArtists_API.
b. In the Fields
View, click the New field icon ![]() . Add
2 fields called searchBox and responseBody.
. Add
2 fields called searchBox and responseBody.
Change the Label text of field searchBox to Search for Artist.
Change properties of field responseBody as follows:
Max. length: 100000, Display type: Text
Area, Display Length: 100,
Number of rows: 50, Label text: Response.
c. Drag a Panel
Control from the Palette View to the top of the page
and give it a Layout Type of FieldGrid. Style
this panel and give it a solid border of 1 pixel, color
#DDDDDD.
d. Drag fields searchBox and responseBody and drop them inside the Panel.
e. Drag a Button
Control from the Palette View below the searchBox field control. Set the button text to Call Spotify Rest API. Also uncheck the New line checkbox of this button so it
appears to the right of the Search field.
The
page should look something like this:

f.
Right
click on the button, select Events and
click the Create new script icon ![]() .
Name the new script SpotifyArtists_API_call.
.
Name the new script SpotifyArtists_API_call.
g.
Add the following lines of code to the script.
|
Script SpotifyArtists_API_call: |
|
// As specified in
https://developer.spotify.com/web-api/search-item/, this Rest web service has
2 Required Query parameters: // q The
search query's keywords, for example q=ABBA // type
Valid types are: album, artist, playlist,
and track - We are using artist in this tutorial // Create an object which will contain the
parameters var parms
= {}; parms.q = fields.searchBox.value; parms.type = "artist"; var resultObject; // Call the get method of the Rest web service.
The response is a JSON-formatted string containing artists matching the
search query's keywords. // The 2nd parameter is where we could pass
request headers to the Rest web service, null in this case as we're not
passing any headers. var response = services.rest.get("https://api.spotify.com/v1/search",
null, parms); if(response.isSuccess()) { if(response.getBody()) { // Store the response body in a form field displayed
on the page to help us understand the response fields.responseBody.value
= response.getBody(); } } |
We
are storing the response body in a form field and displaying it on the page
temporarily. We will hide this later.
Step 3. Run and test the form
Click the Run icon ![]() on the form toolbar to run the form in your
local browser. When the form appears in your browser, enter any artist of
your choice and click the Call Spotify Rest
API button to call the web service.
on the form toolbar to run the form in your
local browser. When the form appears in your browser, enter any artist of
your choice and click the Call Spotify Rest
API button to call the web service.
Note: In
order to understand the response, it’s best to enter a string which will not
match to too many artists, e.g. Kasabian which
will return 3 matches or Mother Kasabian which will return a single match.
Let’s look at the response:
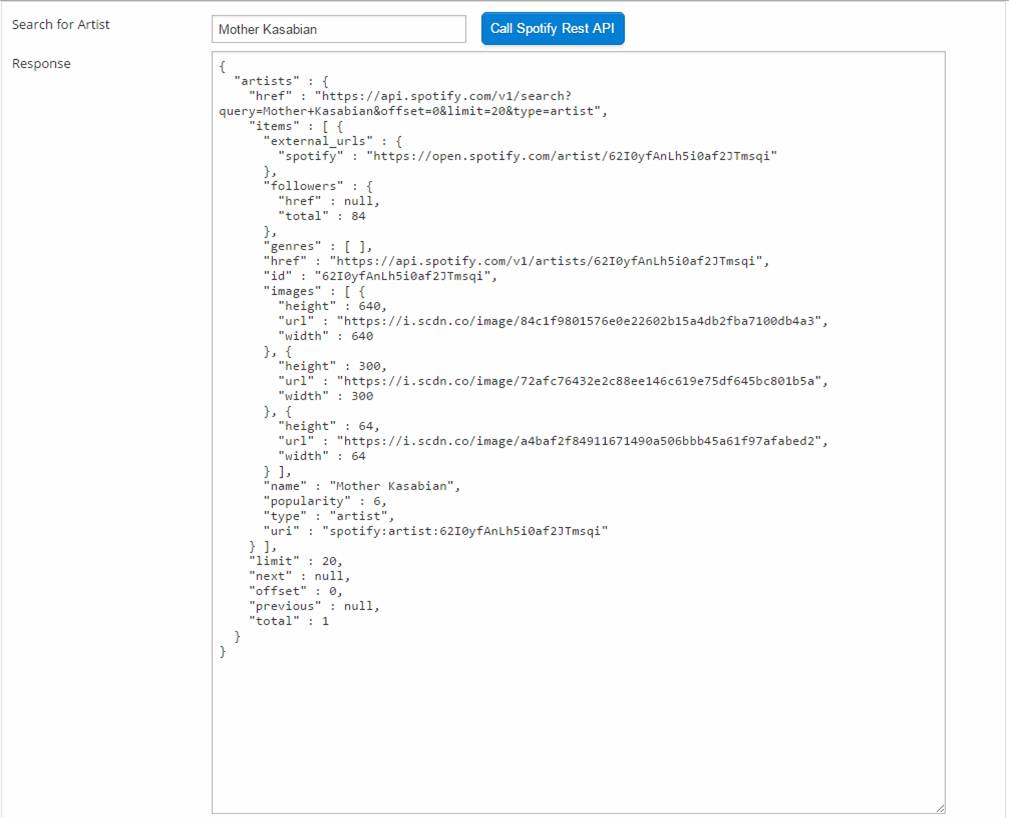
The response contrails a node called artists, which contains nodes: href, items, limit, next, offset, previous and
total .
Step 4. Change the form to display the
total matches found
a. Add
a field called matches_found
to the form, type integer, and drag
it under the response field.
b.
Add the following lines of code to the script,
after line fields.responseBody.value = response.getBody();
|
Script SpotifyArtists_API_call: |
|
// Parse the response body into a JSON object
so that we can extract the information we need resultObject = JSON.parse(response.getBody()); fields.matches_found.value
= resultObject.artists.total; |
c. Save
the script.
d.
Test the form, enter
any artist of your choice and click the Call Spotify Rest
API button to call the web service. The Matches found field will contain the count of artists whose name
contains the query string.
Note:
One of the optional parameters in the request is limit. By default this is set to 20 but can be set to a maximum of 50.
Value of limit determines the number of artists returned by the web service. If
Matches found shows a value > 20,
you will only see the 1st 20 matching artists. In order to get the
next 20, you need to call the web service again passing it the optional
parameter offset. Set this, for
example, to 20 to get artists 21 to 40, to 40 to get artists 41 to 60 etc.
This is just for your information. You will not be
asked to do this in this tutorial.
Step 5. Change the form to display all
the artist names
a. In the Tables
View, click the New table icon ![]() . Add
a table called Artists with prefix
of Artist. Within the same dialog,
add a column to the table called name.
This will result in column called Artist-name.
. Add
a table called Artists with prefix
of Artist. Within the same dialog,
add a column to the table called name.
This will result in column called Artist-name.
b. Drag
this table and drop it below the panel
on the page.
c. Change
the table control name to ArtistsTableCtrl.
d. Within
the Tutorial7 folder, create a new
script called showArtists,
then add the following code to this script.
|
Script showArtists: |
|
function showArtists(resultObject) { // clear contents
of the table tables.Artists.resetTable(); if(resultObject) { //
store the items element in variable artists var artists = resultObject.artists.items; //
iterate through the items and for each item insert a row in table Artists and
set the name column to the artist name for each (artist in artists) { tables.Artists.insertRow(); tables.Artists.name.value
= artist.name; } // Make the 1st row of the table
visible controls.ArtistsTableCtrl.setVisibleRow(1); } } |
e. We
need to call this function from the main script, so:
·
Add script showArtists to the form as a shared
Function. Form Properties -> Events
-> Shared Function -> Add a script containing shared functions -> showArtists
·
Add the following to scipt SpotifyArtists_API_call, after line fields.matches_found.value = resultObject.artists.total;
|
Script SpotifyArtists_API_call: |
|
// call the function to populate the artists
table showArtists(resultObject); |
f. Save
the script.
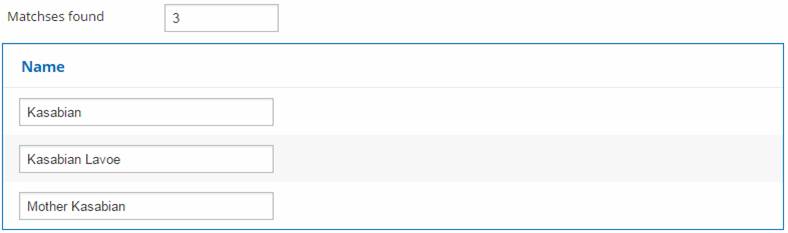
g.
Test the form, enter any
artist of your choice and click the Call Spotify Rest
API button to call the web service. For search string of Kasabian, the
bottom part of the browser should look like this.
Step 6. Change the form to include an
image url for each artist
The response contains
several images for each artist, the last image for
each artist is the smallest one. In this step we add the url for the smallest image for each artist to the
corresponding row
a. Add a
column to the table called image.
This will result in column called Artist-image.
Change the display length of
this column to 60.
b. Drag
this new column to the outline view, above the Artist-name column control.
c. Add
the following to script showArtists, inside the for loop and just
after line tables.Artists.name.value = artist.name;
|
Script showArtists: |
|
// Store the url of the last image for this artist in the image cell
of the current row if(artist.images.length
> 0) { var
index = artist.images.length - 1; tables.Artists.image.value
= artist.images[index].url; } |
d. Save
the script.
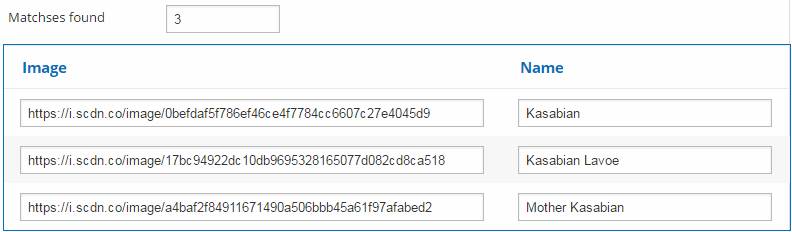
e.
Test the form, enter
any artist of your choice and click the Call Spotify Rest
API button to call the web service. For search string of Kasabian, the
bottom part of the browser should look like this.
Step 7. Change the form to display the
actual image for each artist
a. Delete
the Artist-image column from the
table, in the Tables view.
b. From
the Table section of the Palette
view, drag an Image Column and drop
it above the Artist-name column
control.
c. Within
the General section of properties of this new column, change the Control name of this column to ArtistImage.
d. Within
script showArtists,
replace line tables.Artists.image.value = artist.images[index].url; by the following.
|
Script showArtists: |
|
controls.ArtistImage.setImageURL(artist.images[index].url); |
e. Save
the script.
f. Finally
make the following cosmetic improvements to the form:
·
Set the Table header to Matching Artists
·
Uncheck the Show column headers checkbox of the table control
·
Hide the responseBody
field control
·
Make the entire table Display Only
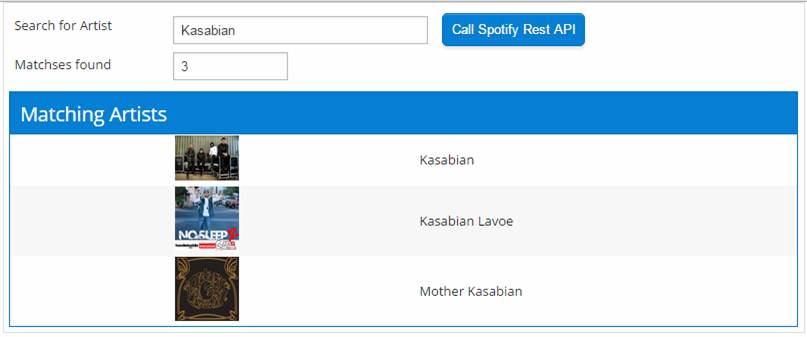
g.
Test the form, enter
any artist of your choice and click the Call Spotify Rest
API button to call the web service. For search string of Kasabian, the
page should look like this.
Part 2 - A REST Web Service call using
an Ebase REST Web Service Resource
This
tutorial works with the same Spotify REST web service
- https://developer.spotify.com/web-api/search-item/
- but this time using an Ebase REST Web Service Resource.
Step 1. Create a REST Web Service Resource
a. Right
click on the Tutorial7 folder in the tree panel, enter New
> REST Web Service Resource and name the form SpotifyArtists
b. In
the General section, set:
·
Description
to Spotify Resource
·
Target Base URI
to
https://api.spotify.com
c. Select
the <default> Endpoint and
set:
·
Description
to Spotify Endpoint search
·
Endpoint URI to
/v1/search
·
Leave the Method as GET
The
Endpoint Properties section should look like this:

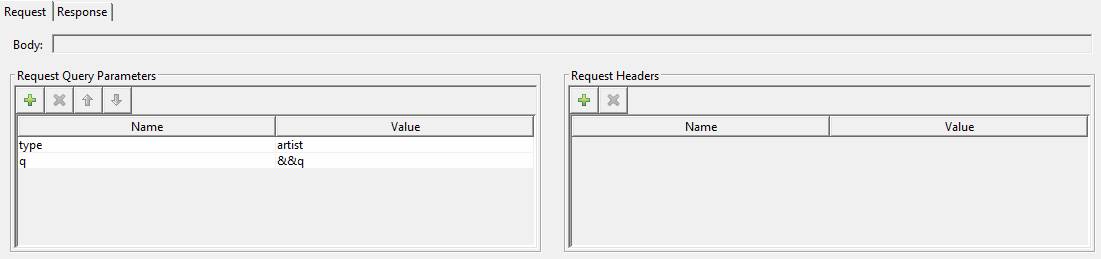
d. Within
the Request section, add 2 Request
Query Parameters:
Name Value
type artist
q &&q
The
Request section should look like this:
e. Within
the Response section, set:
·
Body
to &&response
The Response section should look like this:

f. Within
the Resource fields section, click the Build fields from rest resource icon ![]() .
This will create the
resource fields for any substitutable variables found in any of the REST web
service fields.
.
This will create the
resource fields for any substitutable variables found in any of the REST web
service fields.
The Resource fields section should look like this:

g. Save
the SpotifyArtists resource.
Step 2. Create a new form to use the
above resource
a. The
new form will look and behave the same as the form we created in Part 1, except
it will use the new resource to call the REST web service.
·
Copy and paste form SpotifyArtists_API
into folder Tutorial7
·
Click Keep Both when prompted to choose action
to take. This will create form SpotifyArtists_API_1
·
Rename form SpotifyArtists_API_1 to SpotifyArtists_Resource
·
Change the button text to Call Spotify Rest
Web Service
·
Make the responseBody field control
visible (Uncheck the Hidden
checkbox)
·
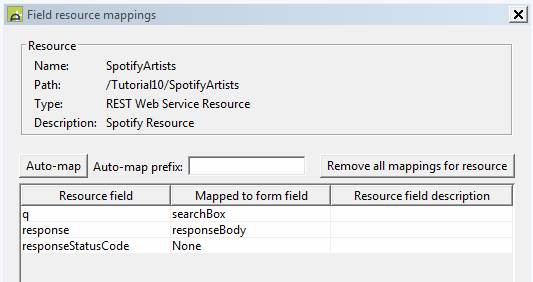
Within the Resources section of the new form, add resource SpotifyArtists to the form
·
Click the Show mappings for
resource icon and map Resource fields to form fields as follows:
b.
Right
click on the button, select Events, remove the existing script, then click the Create
new
script icon
![]() .
Name the new script SpotifyArtists_Resource_call.
.
Name the new script SpotifyArtists_Resource_call.
c.
Add the following lines of code to the script.
|
Script SpotifyArtists_Resource _call: |
|
// Call the REST Web Service Resource, which will build
the request, call the web service and populate the response resources.SpotifyArtists.call(); |
d. Save
the script.
Step 3. Run and test the form
Click the Run icon ![]() on the form toolbar to run the form in your
local browser. When the form appears in your browser, enter any artist of
your choice and click the Call Spotify Rest Web
Service button
to call the web service.
on the form toolbar to run the form in your
local browser. When the form appears in your browser, enter any artist of
your choice and click the Call Spotify Rest Web
Service button
to call the web service.
The response should look exactly the same as in
Step 3 of Part1 for a given search string.
Step 4. Change the form to display the
total matches found and populate the Artists table
a.
Add the following lines of code to script SpotifyArtists_Resource _call.
|
Script SpotifyArtists_Resource _call: |
|
// Parse the response body into a JSON object so that
we can extract the information we need // Note that the resource has already populated
field responseBody and we need to parse this into
an object var resultObject
= JSON.parse(fields.responseBody.value); fields.matches_found.value = resultObject.artists.total; // call the function to populate the artists table showArtists(resultObject); |
b. Save
the script.
c.
Hide the responseBody field control.
d.
Test the form, enter
any artist of your choice and click the Call Spotify Rest Web
Service button to
call the web service.
The response should look
exactly the same as in Step 7 of Part1 for a given search string.
Comparison of the relevant lines of code
Using the API Call |
Using a REST Web Service Resource |
var parms = {};
parms.q = fields.searchBox.value;
parms.type = "artist";
var response = services.rest.get("https://api.spotify.com/v1/search",
null, parms);
var resultObject = JSON.parse(response.getBody());
|
resources.SpotifyArtists.call();
var resultObject = JSON.parse(fields.responseBody.value); |
This completes the tutorial.