Creating and maintaining XML
and Web Services Resources
The following
documentation is available for XML and SOAP Web Service resources:
- Working with XML and SOAP Web
Services Resources provides an overview of
the facilities available using XML Resources and SOAP Web Service
Resources.
- XML Resource Concepts is an in depth technical
description of the operation of the XML Resources and SOAP Web Service
Resources.
- XML Resource Adapters describes the
supplied adapters and parameters to configure them.
- Web Service Adapter how to use the XML
resource with a SOAP Web Service.
- XML Concepts
gives some general information on XML.
This page explains how to use the designer to create and maintain XML
Resources and SOAP Web Service Resources.
Schema (advanced)
Namespaces (advanced)
This documentation applies to both
XML Resources and SOAP Web Services Resources. The term XML Resource
used below applies to either an XML Resource or a SOAP Web Services Resource.
Documents
The documents view shows the
structure of all documents in an XML resource.
In the documents view, new documents can be added or deleted and their
XML structures can be modified. To access
the documents view, click on the documents icon in the XML resource navigation
tree.

Four different icons are used
in the document structure view:
![]() - A single document. The structure of the document is shown under
this tree node.
- A single document. The structure of the document is shown under
this tree node.
![]() - A single or optional XML element node.
- A single or optional XML element node.
![]() - An XML attribute node.
- An XML attribute node.
![]() - Repeating XML element nodes.
- Repeating XML element nodes.
In the document view, you can
define complete XML structures. It is
also possible to reference elements or types from the user schemas. The referenced schema fragments cannot be
edited in the documents view and are show greyed out.
Verj.io resource fields (fields, tables or columns)
can be 'attached' to locations in the document structures. Each attached field is shown alongside its
XML node in blue text.
For example, in the above screenshot, this XML
resource contains three documents: Request, Response and Fault. The document called Request contains only a
single element (getFlights). The
document called Response contains a more complex structure, containing multiple
flight elements, each with multiple Passenger elements. The document called Fault references an
element defined in the user schema. It
is actually the Fault element defined in the SOAP schema, http://schemas.xmlsoap.org/soap/envelope/. Verj.io resource fields have been attached to
various nodes in the Response document and to 'faultstring' in the Fault
document.
Documents
To add a new document - Click the add toolbar icon ![]() and select 'Add document' from the drop down
menu.
and select 'Add document' from the drop down
menu.
To rename a document - Select the document
and click the rename toolbar icon ![]() .
Enter a new name in the document name dialog box.
.
Enter a new name in the document name dialog box.
To delete a document - Select the document
and click the delete toolbar icon ![]() .
.
XML nodes
To add a new XML node - Select the parent
XML node of the new node. Click the add toolbar icon ![]() and select 'Add node' from the drop down
menu. The new node will be selected and
its properties can be edited in the XML node properties panel.
and select 'Add node' from the drop down
menu. The new node will be selected and
its properties can be edited in the XML node properties panel.
To reference an element defined in the user
schema – Select the parent XML node of the new node. Click the add
toolbar icon ![]() and select 'Add node from schema' from the
drop down menu. At this point a dialog
appears showing all available elements in the user schema. Select the required element and click
OK.
and select 'Add node from schema' from the
drop down menu. At this point a dialog
appears showing all available elements in the user schema. Select the required element and click
OK.
To delete an XML node - Select the node and
click the delete toolbar icon ![]() . This node, all of its sub structure and
attached fields will be deleted.
. This node, all of its sub structure and
attached fields will be deleted.
To rearrange sibling nodes – Use the move
down ![]() and move up
and move up ![]() buttons to change the order of adjacent XML
nodes. Attributes will always appear
before elements.
buttons to change the order of adjacent XML
nodes. Attributes will always appear
before elements.
The location of XML nodes can also be changed using
drag and drop functionality.
XML Node
properties panel
The XML Node properties panel
shows the properties of the selected XML node.
All properties are editable, unless the node is from a referenced
schema.
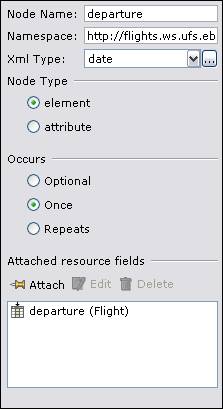 Node
name - local name of the selected node.
Node
name - local name of the selected node.
Namespace -
namespace of the selected node.
XML Type - The
drop down lists some or the common XML types.
Alternatively, the type can be selected from a full list of available
types, by clicking the browse icon. ![]() Choose either a built in XML type, or a type
from the user schemas.
Choose either a built in XML type, or a type
from the user schemas.
Node Type -
select either element or attribute.
Occurs:
Optional: The element may or
may not be present in a valid XML instance document.
Once: The element must occur exactly once for the
XML document to be valid.
Repeats: The element may occur
any number of times in the XML instance document. This type implies a table in an Verj.io form.
Attached
Resource Fields
See table
& fields for more information about fields.
To attach a new field –
Select an XML node to identify the location of the new field. Click the attach button and select 'Attach
Field' from the drop down menu. The new
field is shown in blue text. The name
and type of the new field will be based on the selected XML node. Fields are normally attached to nodes that
been have set with an XML type.
To attach a new table –
Select an XML node to identify the location of the new table. Click the attach button and select 'Attach
Table' from the drop down menu. The new
table resource field is shown in blue text.
Tables are normally attached to repeating ![]() elements.
The name of the table will be based on the selected XML node.
elements.
The name of the table will be based on the selected XML node.
To attach a new column –
New columns can only be added if a table has already been defined. Select an XML node to identify the location
of the new column field. Next, choose a
table to add the column to. Columns are
often attached to child nodes of a table node.
To automatically attach
fields, table and columns to an entire XML
structure fragment. Select the top/parent
XML node. Click the attach button and
select 'Auto attach all' from the drop down menu. Fields, tables and columns will
be automatically added to the selected node and all of its sub structure. A resource field is created for each XML
node that can accept values not nested inside a repeating XML element. A table is created for each repeating XML
element. A column is created for each
nested non-repeating node that can hold a value.
The source field property source field has no value is set depending on the 'Occurs' property option of the XML node:
- Optional – sets source field has no
value to: omit element
- Once – sets source field has no
value to: write empty element
- Repeats – Not applicable
Adapters
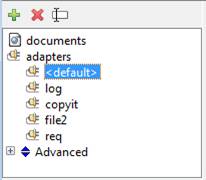
To view or display the properties of an adapter,
select the adapter in the XML resource navigation pane. Each adapter type has a different user
interface. See XML Resource Adapters
for details on the available adapters.
Adapters may be deleted or renamed by
selecting the appropriate adapter and clicking the delete icon ![]() or rename icon
or rename icon ![]() from the toolbar.
from the toolbar.
To add a new adapter:
1.
Click the add toolbar icon ![]() and select ‘Add Adapter' from the drop down
menu.
and select ‘Add Adapter' from the drop down
menu.
2.
Type in a unique name for the new adapter, or leave the name blank to
add a default adapter.
3.
Select the type of adapter you want and click OK.
4.
Edit the adapter properties. (See XML
Resource Adapters for details on a specific adapter's properties)
Schema
Schemas are normally added to the resource using
the XSD and WSDL import facility.
However, it is also possible to add, delete, rename, or modify schemas by hand.
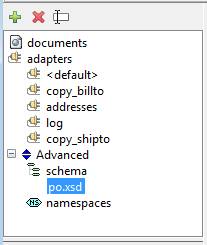
Existing schemas are listed beneath the schema
item. Selecting an individual schema will display the XML schema text for
that schema in the right hand pane. The schema
text can be edited.
Schemas can be deleted or renamed by
selecting the appropriate schema and clicking the delete icon ![]() or rename icon
or rename icon ![]() from the toolbar.
from the toolbar.
To add a new schema:
1. Click the add toolbar icon ![]() and select
‘Add Schema’ from the drop down menu.
and select
‘Add Schema’ from the drop down menu.
2. When prompted, provide a unique name for your schema.
3. Use the editor to enter your schema
text. Alternatively load the text from a file using the browse
button.
To add
a new built-in schema:
1. Click the add toolbar
icon ![]() and
select ‘add built-in schema’ from the drop down menu.
and
select ‘add built-in schema’ from the drop down menu.
2. Select the required built-in schema.
Namespaces
In
the namespace view, it is possible to edit the namespace prefixes used in
source field XPath expressions.
Caution: If a namespace is altered or deleted, any
XPath expression relying on that prefix could stop working. It is
generally better to leave existing namespace information. New prefixes
can be declared for existing namespace URIs.
To display the namespaces view, select the
namespaces item in the XML resource navigation pane.
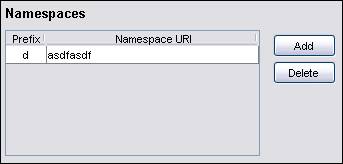
This page lists all namespace prefixes and their
associated namespace URIs. The prefix
and URI can be edited in the grid
To add a new namespace – click the add
button. The prefix and namespace URI can
be edited in place.
To delete one of the namespaces, select the
namespace row to delete and click the delete button.
Tables & Fields
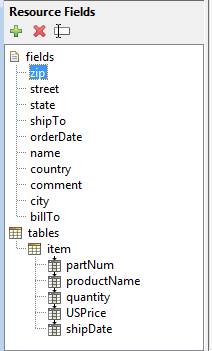
The resource fields panel lists
all resource fields, tables and columns.
In the resource fields panel, resource fields can be added, removed and
renamed. The properties of each resource
field are shown when it is selected in this panel.
A field, column or table may be renamed or deleted
by selecting it and clicking the delete icon ![]() or rename icon
or rename icon ![]() from the toolbar.
from the toolbar.
To add a new field:
1. Click
the add toolbar icon ![]() and
select ‘Add Field' from the drop down menu.
and
select ‘Add Field' from the drop down menu.
2. Type in
a unique name for the new field.
To add a new table:
1. Click
the add toolbar icon ![]() and
select ‘Add Table' from the drop down menu.
and
select ‘Add Table' from the drop down menu.
2. Type in
a unique name for the new table.
To add a new column:
1. Select
the table to which a column is to be added.
2. Click
the add toolbar icon ![]() and
select ‘Add Column' from the drop down menu.
and
select ‘Add Column' from the drop down menu.
3. Type in
a unique name for the new column.
Fields, tables and columns cannot share names.
Select a field, table or column
to display its details in the resource field properties view.
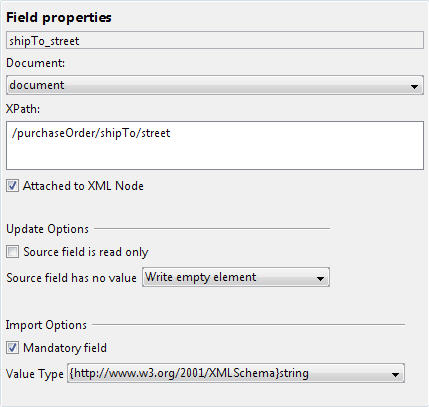
Document – the name of the document that
this field is bound to. A field may also be set as unbound. If this
is the case, the field will not be used to read or write information to
XML. This is often useful when the field is used as an input variable.
XPath – The XPath query used to bind
this field to a location within the XML document.
Attached to XML Node – When
this option has been selected, this field will be visible in the document
structure view. Attached resource fields
are shown (in blue) next to their owner XML node. Attached resource fields remain attached to
their owner XML node, regardless of document structure changes. If the location of the XML node changes, its
XPath will be automatically modified. If
this option is unchecked, then the field will not appear in the document structure
view, and the user is responsible for maintaining a valid XPath statement.
Read only – If selected, this field will
only take part in fetch operations. This is often useful when used with
complex XPath queries.
Source
Field has no value – Determines how the XML node is written to the XML
document if the source field has no value:
·
Omit element – The element or attribute is
removed from the XML document if the source field has no value
·
Write empty element – An empty element is written to the XML document
if the source field has no value e.g <Street/>
·
Set element attribute: nil='true' – An empty element is written to the XML document containing the
attribute nil='true' e.g <Street xsi:nil='true'/>
Note: for attributes, the last two options - write empty element and set element attribute: nil='true' result in an empty attribute
e.g. street=""
Mandatory Field – If selected, this sets the
corresponding mapped form field to mandatory.
Value Type – The field may be given a
type from the XML schema. This has no effect on generated XML, but is
used when the resource is imported into a form. The importer will
determine the Verj.io field type based on the schema type. It will
also attempt to add a suitable field validator to the field (e.g. Maximum
Length).
Importing from an XML
schema
Many of the XML resource adapters support importing an XML
schema. Select the appropriate adapter then click the import icon ![]() on the adapter panel toolbar to start the import
wizard.
on the adapter panel toolbar to start the import
wizard.
Note: Currently, importing an XML
schema clears out all existing resource settings. If more than one XML
schema is needed, they will have to be added manually as described above.
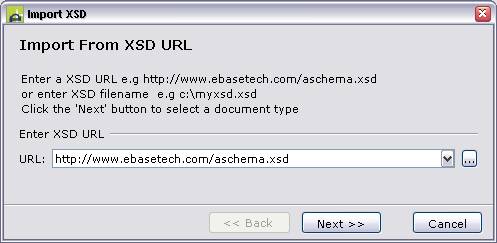
Enter the URL or file path of the XML schema.
It is also possible to import from an XML file.
In this case, the XML file is inspected to infer an appropriate XML
structure.
Click 'Next' to load the schema and move to the
next page.
Each adapter has it's own set of required
documents. For each document, the following page is shown.
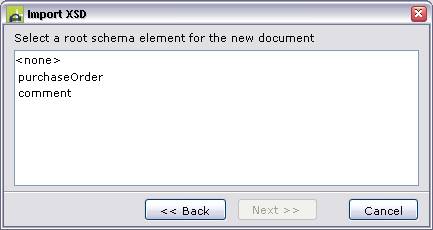
The list contains all
elements specified in the XML schema. Select one of the elements for the
document. Click 'Next' to move to the next page.
In the final page,
select import all fields to automatically generate suitable Verj.io resource
fields (recommended)
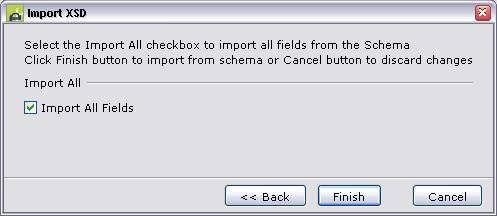
Click 'Finish' to finish
the wizard and create all resource settings.
The following
information will be added to the resource:
The XML Schema text and
its imports - Imports may be modified (see Schema)
Documents - All
documents required by the adapter, each one linked to the specified schema
type.
Fields – A field is
created for each XML node that can accept values not nested inside a repeating
XML element.
Table – A table is
created for each repeating XML element. A column is created for each
nested non-repeating node that can hold a value.
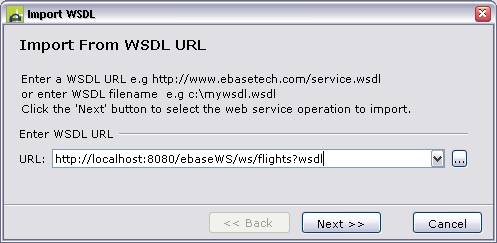
Importing
from a WSDL
The web service adapter is best set up using the
WSDL importer. Select the appropriate web service adapter then click the import
icon ![]() on the adapter panel toolbar to start the
import wizard.
on the adapter panel toolbar to start the
import wizard.
Enter the URL or file path of the WSDL. Click
'Next' to load the WSDL and move to the next page.
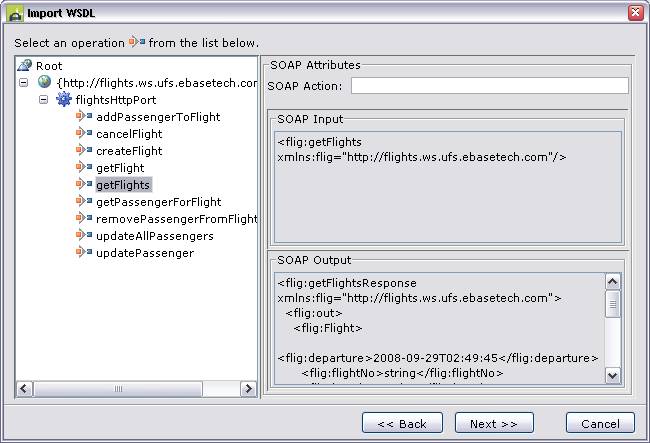
The next page lists all available operations in the
web service. The right hand panels displays an example of what the
outbound and inbound SOAP message body may look like. Select the required
operation and click 'Next'.
In the final page,
select import all fields to automatically generate suitable Verj.io resource
fields (recommended)
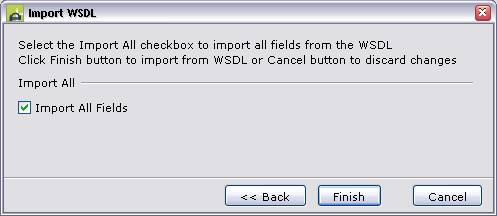
Click 'Finish' to finish
the wizard and create all resource settings.
The following
information will be added to the resource:
The XML schema types –
The XML schema is extracted from the WSDL. Imports may be modified (see Schema)
Documents -
Request, Response and Fault documents are created, each one linked to the
schema type specified in the WSDL.
Fields – A field is
created for each XML node that can accept values not nested inside a repeating
XML element.
Table – A table is
created for each repeating XML element. A column is created for each
nested non-repeating node that can hold a value.
Note:
Importing from an XSD or WSDL and selecting the 'Import All Fields' option
makes an attempt to set the source field property value 'source field has no value' based on the schema element as follows:
- minOccurs is not present: Write
empty element
- minOccurs = '0' :
Omit element
- minOccurs is greater then
1: Write empty element
- isNillable='true':
Set element attribute nil='true'
Example XSD complex type:
<xsd:complexType name="PersonType">
<xsd:sequence>
<xsd:element name="firstName" type="xsd:string"
minOccurs="0"/>
<xsd:element name="lastName" type="xsd:string"
minOccurs="1"/>
<xsd:element name="hobbies" type="xsd:string"
nillable="true"/>
</xsd:sequence>
<xsd:attribute name="personRef" type="xsd:string"
minOccurs="1"/>
</xsd:complexType>
See table and
fields for more information on source field properties