Deployment Wizard
First
Panel – description and target server selection:
Second
Panel – select what to deploy:
Third
Panel – deployment options:
Fourth
Panel – save as Deployment Package:
See also: Deployment Overview
The Deployment Wizard is used to deploy something – an entire application or maybe just a single entity – from the designer to a target server. It can be invoked by:
- Right-clicking in the tree and selecting Deploy
- Right-clicking on a Deployment Package and selecting Deploy Package
- Clicking the Deploy Package icon from the toolbar within the Deployment Package editor
- Re-deploying a Deployment Package using the deployment icon or history on the shared toolbar
Deployment Wizard Panels
First Panel – description and target server selection:
|
Server |
Select a target server as the deployment target. Servers can be added and maintained, click here for details. The icon to the right shows whether the server is currently available. If the selected server is not available, the Next button is disabled. |
Second Panel – select what to deploy:
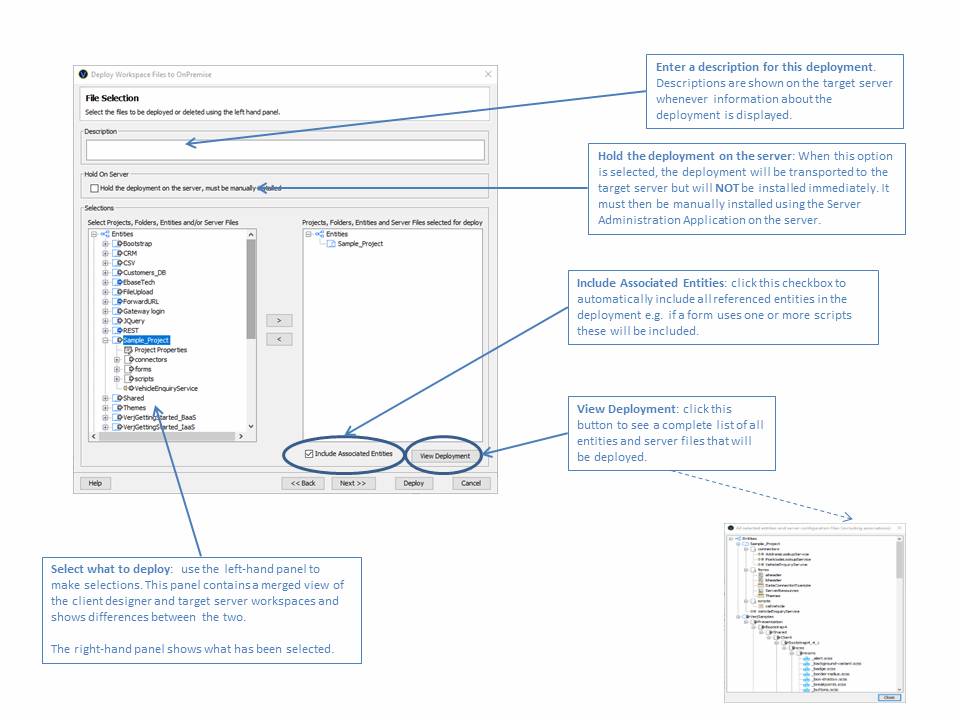
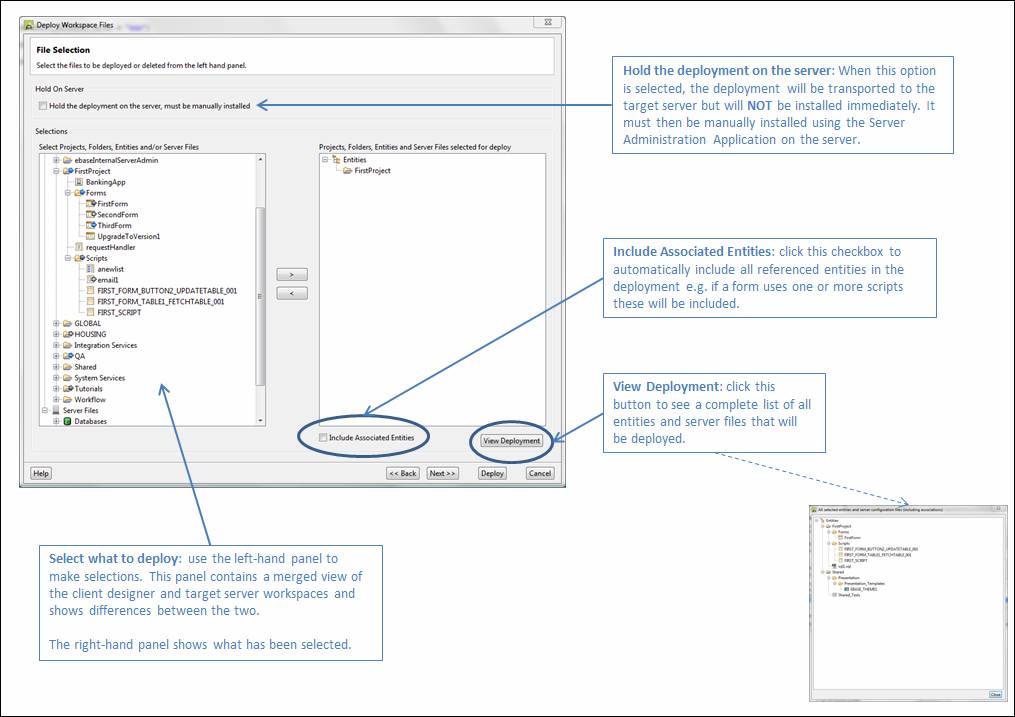
Use this panel to select what to deploy. Make selections using the left-hand panel and the right-hand panel then shows what has been selected. Use the arrow buttons to move items between the panels.
The left-hand panel shows a merged view of the client designer and target server workspaces and shows differences between the two. The icons displayed have the following meanings:
|
|
Indicates that the item exists on the designer but does not exist on the server. Selecting this item will add it to the server. |
|
|
Indicates that the item exists on the server but does not exist on the designer. Selecting this item will remove it from the server. Selecting a folder or project with this icon will remove it and all its children from the server. |
|
|
Indicates that the item exists on both the designer and the server but there are differences between the two. Selecting this item will replace it on the server. |
|
|
The same as the previous icon |
|
|
The same as the icon but also indicates that one or more child items are duplicates with another entity within the designer workspace. See duplicate entities. |
|
|
This entity which exists only on the server is a duplicate with another entity within the designer workspace. See duplicate entities. |
The right-hand panel shows what has been selected for deployment. The icons displayed have the following meanings:
|
|
This item will be removed from the server. |
|
|
This indicates that the selection will result in one or more duplicate entities on the server. This is illegal and therefore the Next and Deploy buttons are disabled. See duplicate entities. |
When deploying a Deployment Package the selections cannot be changed and the arrow buttons are disabled. If you need to change the selections, edit the Deployment Package then deploy it again.
|
Description |
A description for the deployment; this is displayed on the server whenever the deployment is visible. |
|
Hold on server |
When this option is selected, the deployment will be transported to the target server but will not be installed immediately. It must be manually installed using the Server Administration Application on the server. Note that all deployments can be held on the target server regardless of this setting. This option is configured with property Hold Deployments on Server in the Server Administration Application Deployment Properties. |
|
Include Associated
Entities |
When checked any additional entities associated with any of the selections are automatically included in the selection e.g. if you have selected a form, this ensures that all other entities required to run the form are included. When deploying a Deployment Package, this checkbox is read only. |
|
View all selections |
Click this button to see a complete list of entities and server configuration files to be deployed. This is useful when you have selected a project or one or more folders or when the Include Associated Entities option is selected. |
If the project does not exist on the target server, the Project Properties are automatically copied into the workspace for that project. If the project does exist on the target server, the Project Properties are not copied into the target workspace.
To override the Project Properties on the target server,
select the Project Properties ![]() icon into the selected entities panel.
icon into the selected entities panel.
Third Panel – deployment options:
|
Override Server
Configuration Files |
By selecting one or more of the following:
When deploying, the appropriate configuration dialog for the selected server files will popup allowing the user to reconfigure the server configuration file before deploying the file to the target server. |
|
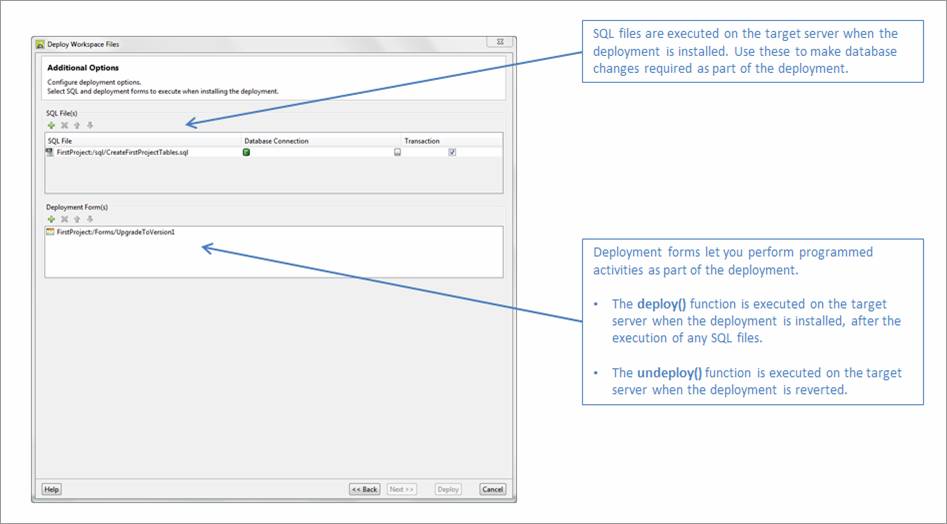
SQL files are executed on the target server when the deployment is installed. Use these to make database changes required as part of the deployment. SQL files are created in the workspace by right clicking in the tree New > Web Resources > SQL File. Database Connection: the name of the Database Connection on the target server. The … button shows the list of connections on the local server, this field can also be typed directly when the connection does not exist on the local server. Transaction: when checked the system will execute all SQL statements within a transaction and issue a commit at the end. In most cases this is exactly what is needed. However some databases e.g. Oracle will fail if a DDL statement such as create, drop or alter is included within a transaction. In this case, the Transaction option should be removed. When you need to execute a mixture of DML statements (select, update, insert) and DDL statements (create, alter, drop), then create separate SQL files for each type and mark the DML statement file as transactional and the DDL statement file as non-transactional. Any error that occurs executing a SQL file will cause the entire deployment to be rolled back. Note that SQL statements are NOT automatically rolled back when a deployment is rolled back. |
|
|
Deployment Forms |
Deployment forms let you perform programmed activities as part of a deployment. They are intended to be used when there is a need to perform changes on the target server as part of the deployment, and this cannot be achieved using SQL files (see previous section). Deployment forms are executed after SQL files as part of the installation of a deployment. They work by searching for and executing the Javascript deploy() function; no other event scripts or form processing is performed. To use a deployment form, first create a form – this is just a regular form, it does not need to be flagged in any way. Then create a server-side Javascript script containing the deploy() function and add the script to the form’s Shared Functions (Form Properties > Events). The form should also contain any fields, tables and resources that are required for the logic of the script.
The corresponding undeploy()function is executed on the target server when the deployment is rolled back. This means that deployment forms have a rollback capability that is not available for SQL files. Any error that occurs executing a deployment form will cause the entire deployment to be rolled back. |
Fourth Panel – save as Deployment Package:
This panel provides the option of saving the deployment as a Deployment Package. This means that you can repeat the deployment by deploying the package. Deployed packages are also added to the quick deploy toolbar.
This panel is not shown when deploying a package.
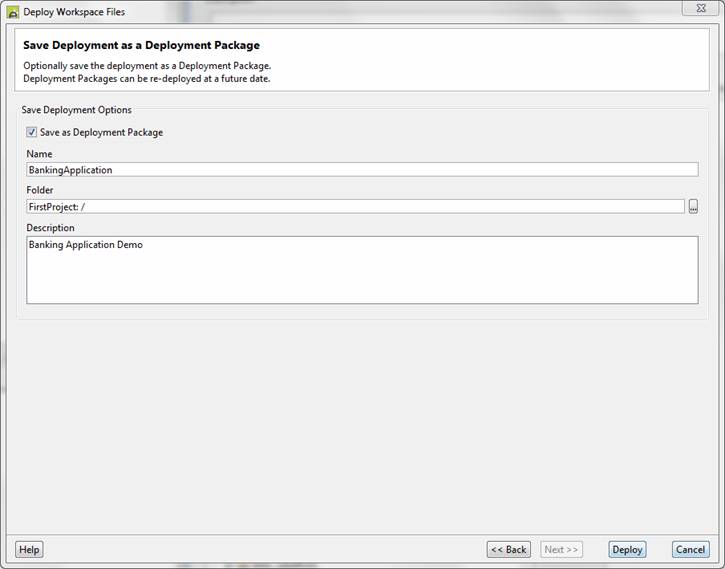
Name: the name of the Deployment Package to be created or replaced
Folder: click the … button to select the location where the Deployment Package is saved. Deployment Packages can be saved in any project.
Description: this is displayed on the server whenever the Deployment Package is visible.
Duplicate Entities
Some entities have unique names or identifiers within a workspace, and when this is violated duplicate entities exist. This includes:
- Forms: the name of each form must be unique within each workspace. This is because forms are referred to – in a URL or a call form script statement – using just the form name, and the system has to be able to identify which form should be loaded using just this form name.
- Workflow Processes: the name of each workflow process must be unique within each workspace. This is because workflow processes are referred to using just the process name.
- Integration and System Services: the web service name within each service must be unique within each workspace. This is because these services are invoked by callers using this unique web service name.
The system will not allow you to create duplicate entities within the designer, and it will not allow you to create duplicate entities on a server as part of a deployment. The following scenarios provide some examples of this and explain how to rectify the situation:
Scenario 1: deploying
a form creates a duplicate on the target server
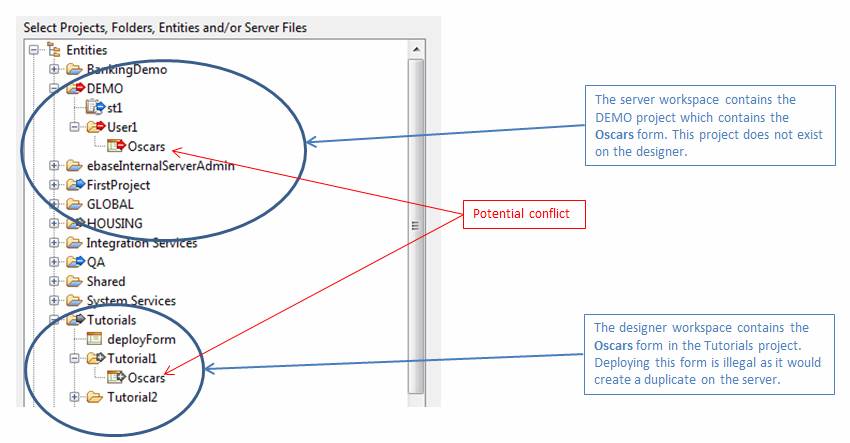
In this scenario the Oscars form would be duplicated as a result of a deployment. In the designer this form exists only in the DEMO project, whereas on the server the form exists only in the Tutorials project. So deploying this form from the designer to the server would create a duplicate on the server, which is illegal. Each time a deployment is performed, this potential error will be highlighted in the left-hand panel of the selections screen using red icons – moving the mouse over the error items will show an info message containing the duplicate entity location:
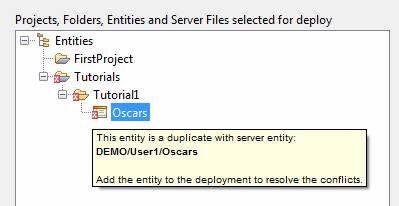
If the Oscars form in the Tutorials project is selected for deployment an error will be shown in the right-hand panel, and the Next and Deploy buttons will be disabled as this would create duplicate entities on the server:
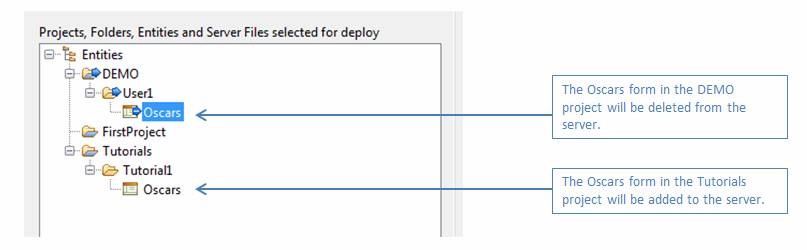
To remedy this situation, we need to decide which version of the Oscars form should exist on the server. Assuming that the answer to this question is the version in the Tutorials project, we then need to delete the version in the DEMO project on the server. This is done by selecting the Oscars form within the DEMO project in the left-hand panel and adding this to the selections. This then removes the conflict and the Next and Deploy buttons are enabled.
Scenario 2: duplicate
ids exist in the designer
This scenario is relatively unlikely as the designer will
prevent you from creating duplicate entities e.g. two forms with the same name.
However it can happen if files are copied into the designer’s workspace using
external tools. In the following scenario the Oscars form exists in both the DEMO and Tutorials project within
the designer. Both forms are shown with the error icon ![]() :
:
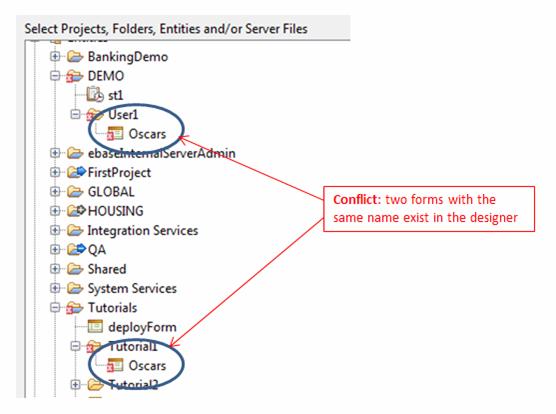
To remedy this situation, one of these two forms should be renamed. This problem exists only in the designer, the server is not affected.
Database Connections
Database Connections are saved as server configuration files and these are handled differently from other server configuration files. When the deployment includes a Database Connection:
- If the Database Connection does not exist on the target server, a popup panel is displayed which allows you to configure the connection properties on the target server e.g. url, username and password properties probably need to be configured for the target server.
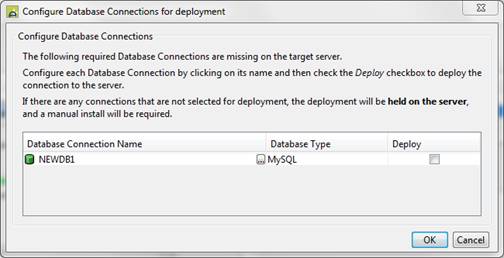
Click on the Database Connection Name to configure its properties then click the Deploy checkbox to include the changes in the deployment. If one or more Database Connections are not selected, they will be included within the deployment regardless, and the deployment will then be held on the target server to show that manual intervention is required i.e. the Database Connection should be configured.
- If the Database Connection does not exist on the target server, it will be excluded from the deployment i.e. the Database Connection on the target server will not be changed.
Deployment Response
Clicking the deploy button at the bottom of the wizard deploys the selected items to the target server.
If the deployment is successful, this response is displayed:
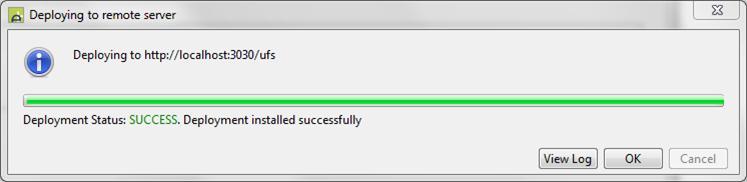
Click the View Log
button to display and optional save the log file from the server. All logs are
saved on the server system and can be viewed by running the Server Administration Application on the
server and selecting
If the deployment is unsuccessful, this response is displayed:
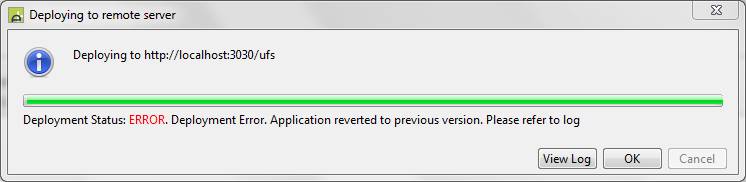
Click the View Log button to display and optional save the log file from the server.